ADOBE OVEN PAGE
NOTICE: I am leaving this page up on my web site
for reference only.
I no longer own the residence where the oven is located nor
can I answer any questions about it.
Return to
Alan's Home Page
Contact Alan Nielsen
Revised: January 15, 2003 then
updated December 25, 2011
We cooked the Thanksgiving Turkey in it.
The Thanksgiving Turkey turned out great
Safety Concerns we found out about
Start of Construction
Phase 1 - Rounding up of the materials
Phase 2 - Layout of the Oven
Phase 3 - Adobe Dirt-Getting it
Phase 4 - The big Mix
The First Fire
The Next Day, painting the oven
The Big Test
Today was the big day, we cooked the Thanksgiving turkey in the oven, it turned out great but we did learn a few things. First of all here is the turkey.
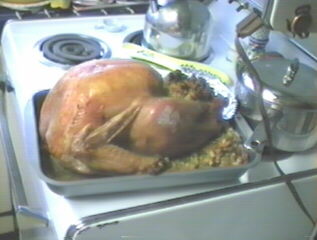
I can tell you this, it was very moist and tasty, we had a couple of problems which I will describe now.
First of all, I need to get a thermometer, one with a sensor inside the oven and a gauge outside. Our oven either did not get hot enough or we lost heat somewhere. During most of the cooking time, the inside temperature was about 250-275 degrees and when the bird was due to come out, the inside temperature was only 170 degrees instead of 190 so brought it into the house and put it in the inside oven which was hot, just in case.
I am not sure why the oven either was not hot enough at the start or lost heat somewhere but the next time, I will attempt to do a better job of monitoring what is going on.
Right now I think we need to get a better and hotter fire, the charcoal should work but then maybe I should have used walnut or other logs that give off more heat. The wood I used was some old cut up pine fence posts and some other tree limbs from the yard. It may have been a little wet. Our fire burned for three hours but may not have been hot enough.
I do not think there was any major loss of heat as we did plug the vent with a damp rag and the door fits tight. I placed a thermometer on top of the oven after we took out the Turkey and the temperature on the surface was about 110 and inside was about 250. This time we did develop a few hairline cracks in the shell, but that is normal.
Safety Concerns.
After building three fires in the oven and experienced some pain and suffering I recommend the following:
- When building the fire and poking the logs, wear long gloves,
eye protection, and a wool hat on your head.
- Susan had her eyelashes and some of her hair singed during
the second burn.
- There are cinders flying around while the fire is burning
and eye protection is a must as you never know when an ember may hit your
eye, also the goggles [recommended] will keep some of the smoke out of
your eyes.
- Wear gloves, you may think that you can stick you hand inside even for a moment to do something.
DON'T DO IT, you can get a flash burn which may singe the hair on your
arm or even cause a minor burn. WEAR GLOVES and a long sleeve wool shirt.
- When you remove the hot coals, make sure you have a metal
bucket and douse the coals with water.

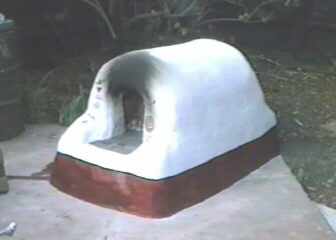
5 days of drying, this is what it looked like from the front.
Our Experiences at building
an adobe oven.
By
Alan E. Nielsen Sr
This is all about the article in the August 1998 Sunset Magazine called Sunset's Classic Oven Susan found the article and wanted to build the oven so that she could cook our Thanksgiving turkey and make breads in it. We had an area in our pool yard which was a suitable location for the oven. It was located on top of concrete patio and away from any combustible materials. Well here is our story on the construction of the oven.
PHASE 1 - Rounding Up The Materials
Started middle of October
OK no big deal just follow the list....
Concrete building blocks and cap blocks, we found them at the local Orchard Hardware Store, not very expensive.
Fire bricks, well, this is something not carried in the local Hardware Store, had to call around and found a building supply place that had them but they were open 8-5 on weekdays and for a few hours on Saturday morning. I did manage to get down there on a Saturday morning and purchase the 60 some odd bricks at about .87 cents each.
Looking for a cardboard barrel was a little harder, you don't find them in the local hardware store and janitorial places may not be open on weekends. Well funny thing, I found one in my garage. I had it full of shavings which I used years ago when I had chickens for their nests. Well didn't need the shavings anymore so they got dumped in the South 40 and the barrel was cut in half and used for the top form.
Empty quart can, well that was sort of easy except that a lot of cans you find in the store with juice are larger. We did find a can of ravioli that was one quart and we had the ravioli for dinner.
The wire mesh and chicken wire was not a problem, the local Orchard Hardware Store had them but not in the same size and I felt it didn't matter so we purchased something close to the sizes they called for. Turned out we had extra.
The redwood 2 x 4 x 48 and the other piece of redwood was readily available at the local lumber yard.
The screws and aluminum flashing were also available at the local hardware store.
Most of it done in the Middle of October
We put down the concrete blocks and soon discovered that in order to make the thing come out to a 32 x 54 inch base, well it didn't work. Typo error I guess, the 54" should really be 56". Also we found out the blocks were less than 8" and Less than 16" as you are suppose to put mortar in between them in the real world. I wanted to do this, along with some reinforcing material as we live in California and do have shakers once in a while. Wife did not want to deviate from plans, so we left a gap. I know the slugs and ants and other critters will have a field day once they get in between the cracks.
When we put on the row of fire brick, then we new for sure that we needed the spaces between the concrete blocks in order to make the whole thing fit right.
The next thing was to cut the cardboard barrel in half, I used my Sawzall saw and then placed half on top of the fire brick as in the photo. Oops, my barrel was a little longer so had to cut it in half and overlap to make it fit. Cut a hole and put the quart can in place. NOTE: use a smooth can as one with ribs will get stuck and won't slide out very easy.
The door was easy to make, I just cut the pieces then screwed them together. Wife drew an arc and I cut the arc out with my handy saw. The aluminum flashing was then tacked around the outside edge. The door was set in place.
We then added the 6 x 6 mesh over the barrel and down the sides, tucking it in under the fire brick. All was now in place and ready for the messy mixture.
Chicken wire was added over the 6 x 6 mesh and formed around the door and back.
Phase 3 - Finding the Adobe Dirt
Now came the dirt, 8 wheel barrows of Adobe Dirt. Here in my neighborhood we have a lot of it around, the sticky stuff they call adobe, but the real stuff is in Arizona or New Mexico per all the articles I read. I picked up the phone and made about 25 calls to soil and or dirt places listed in the yellow pages until I found a place that said they had Adobe Dirt. It seems that we have a lot of the stuff around but no one has it for sale. I took a day off from work and went to this place that had "Adobe Dirt" but it was full of rocks and other crud. The yard person was from Mexico and knew a little about building ovens and he suggested a for of clay dirt that they had so I purchased 1/2 yard of the stuff which was all my 1/2 ton pickup would hold. I could have taken more but I had to drive 50 miles home and did not want to overload it and I figured the 1/2 yard would be plenty.
The Weekend of November 1, 1998
We waited for a Saturday, made sure we had help, third person, then started on the project about 10 am. I did a stupid thing and tried to mix the first batch of mud in my cement mixer, DO NOT TRY THAT, it doesn't work.
What we did was use a dog food dish [borrowed it from the dogs for a day] and dumped 6 dishes full of dirt into the wheel barrow and then two dishes of Portland Cement. I had a bag of clay mortar and dumped a couple of dog food can sized portions of the clay into the wheel barrow also. Next, we stirred the dry mixture and then added water, had on Latex Gloves and squeezed and mixed the mess until it was like peanut butter. Very sticky, soft and gooey. We then started filling the area between the barrel and the wire and then all over, building the oven in the shape it is in the pictures.
It took us all day and until about 5 pm to finish putting the mud on. It did look good, I would like to have used more chicken wire as I like to have good reinforcement. Susan said that it was not in the picture so we should not do it. Once the mud was around the door, we moved it in and out to make sure it was not stuck. Susan is very creative and did a real nice job of shaping the structure as you can see in the photos. Towards the end of the construction, it started to rain and I quickly put up a tarp over the whole thing sod we could continue to work. The rain drops left marks in the mud so thus the tarp was necessary. Once finished, we covered with damp towels and put plastic trash bags and a small tarp over it and that is how it stood while we waited for it to dry.
Updates
After 5 days of drying, we only have a couple of hairline cracks in the back, they will be easy to fix. Will probably build a fire in it next weekend.
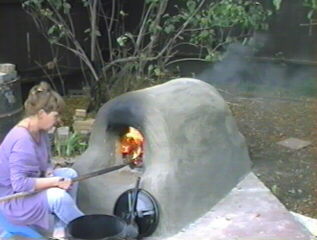
First Fire - November 8th
Well it has been a week since the oven was constructed. We had damp towels on it every night and the tarp over the top. Today, Susan was ready to light the thing which she did in the above pictures. Well we got a rip roaring fire going and then the cardboard barrel burned and boy did it kick up a cloud of smoke. I called the local fire district [I do have connections you know] and suggested that if someone called in a smoke investigation in the area of my home, well we were starting this adobe oven up. Well finally after an hour or so, there no longer was any smoke. The oven heated up and you could feel it on the outside, not hot enough to burn you hand but it was warm. We put briquettes into the fire to keep the thing going all night. We did not want to over do it. At first, the oven did sweat a lot as moisture was evident on the surface. Not it is drying out and the color changed from gray to an off white. Oh we did not find any cracks so far other than a couple of hairline cracks which can be fixed.
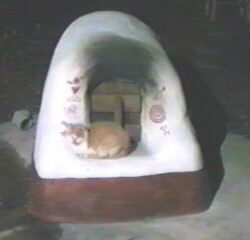
The Next Day - Monday November 9th
This evening, Susan painted the oven with a white latex and the lower portion with a cherry red latex paint. She also put on some designs as can be seen in the front of the oven.
The first big fire and a test cook out.
November 11, 1998
Today was the big test. First I had to go to the store and pick up a few things but found out that no retail stores carry an oven thermometer the goes over 500 degrees. We were also looking for long gloves but the longest was only 16 inches. I purchases a bucket to put the ashes in and some tools for raking, cleaning, shoveling, etc the ashes.
Before lighting the fire, I added a four inch piece of stove pipe to the chimney hole. I did this because when we start cooking, it will have to be plugged and I bought a cap to put over it when the fire was out.
The instructions call for a lot of wood to get this thing going, Susan followed the directions exactly and in two hours, we had a pretty good fire and the oven was hot, however there was still more to burn. I had some pretty good logs that burned well.
One thing we found out we needed was a poker for poking the ashes and wood. I went to the hardware store and purchased a 4 foot long piece of 1/2 inch galvanized pipe. Put a cap on one end and a tee with a couple of plugs on the other. This worked quite well as a poker with the T end being the handle.
After three hours or so, the coals were raked out and into the bucket filled with water. We ended up filling it three times. The inside was then brushed out with a wet brush and then a wet towel.
I put the thermometer into the oven and after fifteen minutes or so, it was way off scale, hopefully somewhere around 700 degrees like the article said. I then checked it every 15 minutes or so until it was down to 450 at which time we did some garlic biscuits. The temperature seems to drop fast around this time or we had a leak as the biscuits did not seem to brown but they did cook well. Susan took them out and boy they were delicious.
The next item put in the oven was a loaf of bread and the evening dinner which was meatloaf. The temperature is now around 325, it appears it dropped off faster than we though, however we did open the door a lot so that may have had something to do with it.
I am going to upload this now and we will let you know how the meat loaf turned out tomorrow night.
My cat found a nice warm place to sleep after cooking a meatloaf
.